The Easy Guide To Get A Vietam Visa Online

Visitors going to Vietnam must show a valid Vietnam visa before being allowed into the country. That’s easier said than done: compared to getting visas for other Southeast Asian countries, Vietnam is a tougher nut to crack. You should know about guide to get a Vietnam Visa online.

How to get a 3 month Vietnam Visa

Once you get into Vietnam, you will not be able to extend your Visa. Knowing that, we started to research how to get a 3 month (90 day) Visa for Vietnam.

Many forums and blogs were steering us away from using an online agency. We read horror stories from people saying that fake agency sites stole their money, issued them fake approval letters or simply never got back to them in time. We started studying guides about going to a Vietnam consulate in neighbouring Cambodia in order to apply in person. It all started to get super overwhelming and we almost scrapped our Vietnam plans all together.

That was, until you can  found a recommendation on Focus Asia Travel for this agency called Vietnam Visa Service, which turned out to be AMAZING! They were fast, professional, fair priced and above all else

What Type of Vietnam Visas Can You Get?

Vietnam has a 1 Month Visa, 3 Month Visa and 1 Year Visa (note: the 1 Year is for USA residents only)

For each length of Visa you can choose if you want it to be single entry or multiple entry. The single entry is cheaper than a multiple entry, so if you don’t plan to leave Vietnam at all during your stay, choose that one to save some cash. If you are going to be coming and going from Vietnam during your stay, you will NEED the multiple entry, which allows you leave and re-enter without re-applying.

*Note: After I had already applied for the single entry Visa, I found out that I might have to leave halfway through my 90 days on a 3 day work trip to Thailand. I emailed their customer service and asked if I could amend my application. They emailed me back within an hour and told me that wasn’t possible and that once you have an approval letter for a single entry, that is set in stone. However, if I did have to go to Thailand, I could simply re-apply for another 90 day single entry Visa while I was in Thailand.

Once you have picked the type of Visa you need, you will choose how fast you need it sent to you. I was in no hurry at all, so I picked the 3 Day Service (because it’s also the cheapest!) If you are in a mad rush, they have a super fast 2 hour turn around time, which blows my mind!

get Vietnam visa online

Vietnam Visa

How Much is A Vietnam Visa?

1 Month (30 Day) Vietnam Visa

Single Entry

$20 – 3 Day Service

$30 – 1 Day Service

$55 – Half Day Service

$75 – 2 Hour Service

Multiple Entry

$25 – 3 Day Service

$35 – 1 Day Service

$60 – Half Day Service

$80 – 2 Hour Service

3 Month (90 Day) Vietnam Visa

Single Entry

$35 – 3 Day Service

$45 – 1 Day Service

$70 – Half Day Service

$90 – 2 Hour Service

Multiple Entry

$70 – 3 Day Service

$80 – 1 Day Service

$105 – Half Day Service

$125 – 2 Hour Service

Once you know what service you want, click the big green ‘Apply Now’ button on the home page and fill out the form.

The company has some up-sell items, like having someone meet you at the airport or keeping your name private, but we didn’t select any of those.

We were flying from Kuala Lumpur into Ho Chi Minh, so we selected SGN airport on the form, put in our date of arrival, and our Passport info. (I double checked that the site was secure with the little padlock in the address bar before I filled all my passport info in).

For a 3 Day Service, 3 month (90 day) single entry Visa for myself and my husband, it came to $70 USD, which I paid for using PayPal.

Get a Vietnam Visa Online

Vietnam Visa Centers

Getting Your Vietnam Visa Approval Letter

They emailed me over my approval letter and entry form with these instructions:

  • Print this Entry Form and Approval Letter off (can be colour or black and white) and bring it with you into Vietnam
  • Get 2 passport sized colour photos for each traveller
  • Take everything to the ‘Landing Visa Counter’ that is located just before the immigration counter at the arrival airport into Vietnam
  • Bring $25 USD per traveller for the stamping fee (that is for single entry. The multiple entry stamping fee is $50 per person)

The approval letter showed my name and my husbands name and we checked that it had the correct 90 day visa, which it did. The entry form was similar to a normal immigration form you fill out to gain entry to a country, just a little more detailed.

We were in Bali at the time so we just printed off the forms at our hotel and found this local shop for our Passport photos. The photos for both of us cost $50,000 IDR which is around $4 USD.

Proof of Onward Travel For Vietnam

Travelling around South East Asia, we learned quickly that many countries want proof of onward travel, even if they don’t always enforce it. Nothing kills the vibe quite like not being able to board your flight, so we’ve gotten into the habit of booking cheap/refundable plane tickets just incase. In the case of Vietnam, we found a cheaper alternative that would still give us the same proof of onward travel we needed. A bus ticket! We booked 2 bus tickets from Ho Chi Minh to Phenom Penh for around $10 USD each.

We were never asked to show proof on onward travel this time, but at least we had it.

(We flew out of Denpasar in Bali, with a quick stop in Kuala Lumpur, on Malaysia airlines to SGN airport Ho Chi Minh)

Arriving in Vietnam with an Online Visa

Showtime! Here is where we find out if our Visa Approval Letter is real… or if we’ve just been scammed.

We got off the plane in SGN and proceeded towards immigration. Just like our email explained, there was a little area just before the immigration counters with a sign that said ‘Landing Visa Counter’.
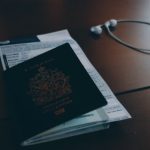
With our passports, passport photos, entry form and approval letter, we approached the counter and handed them everything. They told us to take a seat and wait. After about 15 minutes, they called our names back to the counter and asked us to pay the $25 USD each for the ‘stamping fee’. We had already gotten a crisp $50 USD bill back in Bali, so we handed it over.

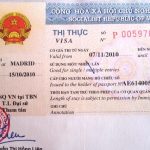
They took the $50 and handed us back our passports with a shiny new visa inside!

That’s it! DONE!

We then proceeded over to the immigration counter, which was mind-boggling simple as well. They just took a quick scan of our passports and nodded us through. No questions, no interrogations, and thank god… no “this Visa is fake!” surprises.

It all went smoothly. Insanely smoothly.
It was actually so smooth and easy that I wondered why the hell I had gotten so paranoid abut the whole process. Sometimes blogs and travel forums can make you more confused than anything. I am so glad I gave Vietnam Visa Center a chance instead of listening to all the doom and gloom advice online.

Get a Vietnam Visa Online

Vietnam Visa example