Beginner’s Guide to Packing a Rucksack

If you’re new to overnight camping, having to cram all of your stuff into your rucksack can be intimidating, but when you break it down, every object will have a position and, ideally, it will all fit! It is important to have the weight of your gear stored in the correct location to avoid injury and to keep you balanced.
Not only do you consider the weight, but also what you will need to access during the day and the order in which you can remove items from your hiking pack when you arrive at camp. You may have seen my latest article about What to Bring on an Overnight Hiking Trip. So, to get you started, I’ve put together a beginner’s guide to carrying a rucksack (aka your hiking bag) in this article!
Waterproof your gear
- Before you begin packing, make sure your gear is waterproof. Not everyone has to be waterproof, however, your sleeping pad, sleeping sheet, and clothes should be fully waterproof to the extent that you can submerge your pack in a river and it will all be dry!
- Using a pack liner is the easiest way to do this.
- This can be a high-quality fully waterproof liner, such as the Snowys sea to summit pack liner series, or a heavy-duty garbage bag.
- This lining “lines” the interior of the back so that all of your gear fits inside and stays dry.
- You may like to individually pack some items in dry bags or compression dry sacks also available by sea to Summit at Snowys.
Pack your sleeping bag and mat first
- Once waterproofed you can start packing your gear.
- Pack your sleeping gear such as your sleeping bag and sleeping mat first down the bottom of your pack (if you are using a closed-cell foam mat you may like to put this on the outside of your pack as it is quite large).
Pack your clothes in the spaces
- Around the sleeping bag and mat, you should stuff all your clothes pushing them into all the little holes
- Remember to keep a jumper or warm jacket handy at the top of your pack
Pack heavier cooking items close to your back
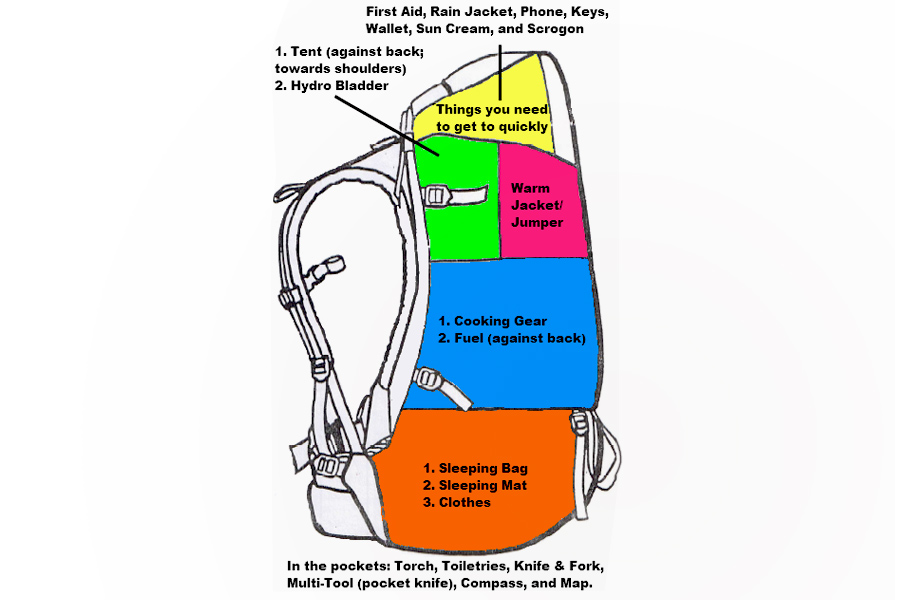
- Next, I like to pack in my lightweight cooking gear, placing heavier items such as the fuel closest to my back.
- This helps to position more of the weight over your hips.
- The hips are the best part of your body for carrying heavy gear, with the small of the back most suited to carrying the brunt of the weight.
- This is done to lower your center of gravity and increase your stability (especially when walking on uneven terrain).
- A bag with a ridged back will also help to carry the load and protect your back from being poked by sharp instruments.
Carry a hydro bladder
- Similarly to above, place the majority of your water against your back on top of the cooking gear.
- The best way to carry water is in a hydro bladder such as the Camelbak Unbottle 2L, Black Wolf 2L Bladder/Reservoir the Sea to Summit Pack Tap (not currently online).
Bottles are okay, but they take up the same amount of space even when empty
Place food around your water and away from your back
- Foodis best placed around the water and a bit further away from your back.
- Again, try to put the heavier items towards your back and the light items around the edge.
Place your tent at the top of the bag
- This may strike some controversy, but I place my hiking tent towards the top of my back against my shoulders.
- The reason is that your tent is the first thing you set up when you get to camp and the last thing you pack away when you leave (especially if it’s raining), so I like to have it handy.
- It’s also a very easy item to remove and get to your food and water during your hike.
- Placing it directly on your shoulders will ensure you are balanced and carrying the weight through your legs.
Keep a jacket or jumper close to the top
- The last thing I place in the main compartment of my pack is a warm jumper.
- Even though you may be warm while you’re hiking you will cool down very quickly when you stop for a break.
- If you’re working up a sweat it can be a good idea to remove your shirt and put on just your jumper when you stop to ensure you don’t get too cold.
Close your pack liner when full
- Now that your main compartment is full, close your pack liner.
Rain Coat and First Aid Kit in the top pocket
- Just about all packs have a pocket in the top lid of the pack.
- I use this to place my raincoat and first aid kit; two very important items that may be needed quickly.
- Make sure your first aid kit is completely waterproof.
- If you have the room you can also place snacks up top.
Toiletries, tools and electronics, knives, and accessories go in the little pockets
- Again, most rucksacks will have either pocket on the side or at the front of the pack.
- This is where I place all the little items such as toiletries, toilet paper, and trowel, head torch, multi-tool (pocket knife), wallet, keys, phone, etc.
- If you don’t have any other pockets you will need to squeeze these items in your top lid pocket or in your main compartment.

It may take you a few goes to get it right and for your first time, pack and re-pack your rucksack a few times, testing it out to make sure you have the balance of weight correct. You don’t want your pack to be lopsided or pulling you back and you don’t want any sharp bits poking you through the harness. A neat pack is usually a well-packed pack so keep everything neat and tidy, don’t hang anything on the outside of your pack (unless it’s your roll mat or hiking poles), and make sure your pack is fitted correctly. Once you get more experienced you will find the perfect place for every item you take but the instructions above will give you a good idea of what to pack where and how to distribute the weight.
If you take the time to pack your rucksack correctly your body will thank you for it and you will have a much more enjoyable time!